1
2
3
4
5
server-id = 223344 log_bin = mysql-bin binlog_format = ROW binlog_row_image = FULL expire_logs_days = 10
重启mysql
查看bin_log是否成功开启
1
2
3
4
5
6
7
show variables like 'log_bin'; +---------------+-------+ | Variable_name | Value | +---------------+-------+ | log_bin | ON | +---------------+-------+
权限信息配置:
1
2
3
4
5
6
7
8
9
10
11
CREATE USER 'debezium' @'%' IDENTIFIED BY 'debezium' ;GRANT SELECT , RELOAD, SHOW DATABASES , REPLICATION SLAVE , REPLICATION CLIENT ON *.* TO 'debezium' IDENTIFIED BY 'debezium' ;alter user 'debezium' @'%' identified with mysql_native_password by 'debezium' ;GRANT ALL PRIVILEGES ON *.* TO 'debezium' ;FLUSH PRIVILEGES ;set password for debezium@% = password ('debezium1' );
1.4.0新增的配置:
官网参考文档:
https://debezium.io/documentation/reference/1.4/connectors/mysql.html#enable-mysql-gtids
GTID有四个模式,依次是:
1 2 3 4 5 6 7 8 9 10 11 12 13 14 15 16 17 18 19 20 21 22 23 24 25 26 27 28 29 30 set global ENFORCE_GTID_CONSISTENCY = WARN;set global ENFORCE_GTID_CONSISTENCY = ON ;set global GTID_MODE = OFF_PERMISSIVE;set global GTID_MODE = ON_PERMISSIVE;SHOW STATUS LIKE 'ONGOING_ANONYMOUS_TRANSACTION_COUNT' ;set global GTID_MODE = ON ;show global variables like '%GTID%' ;+ | Variable_name | Value | + | binlog_gtid_simple_recovery | ON | | enforce_gtid_consistency | ON | | gtid_executed | e4f221c9-4fd0-11eb-ab60-fabde5f10e00:1-40 | | gtid_executed_compression_period | 1000 | | gtid_mode | ON | + set global binlog_rows_query_log_events=ON ;show global variables like 'binlog_rows_query_log_events' ;+ | Variable_name | Value | + | binlog_rows_query_log_events | ON | +
1 curl -X GET -H "Accept:application/json" localhost:8083/connectors/|python -m json.tool
1 curl -X GET -H "Accept:application/json" localhost:8083/connectors/job |python -m json.tool
1 curl -X GET -H "Accept:application/json" localhost:8083/connectors/job/status|python -m json.tool
1 curl -X PUT localhost:8083/connectors/job/pause
1 curl -X PUT localhost:8083/connectors/job/resume
1 curl -X DELETE -H "Accept:application/json" localhost:8083/connectors/job
1 curl -X POST -H "Accept:application/json" localhost:8083/connectors/job/restart
1
2
3
4
5
6
7
8
9
10
11
12
13
14
15
curl -i -X PUT -H "Accept:application/json" -H "Content-Type:application/json" 172.20.3.x:8083/connectors/job/config -d '{ "connector.class": "io.debezium.connector.mysql.MySqlConnector", "database.allowPublicKeyRetrieval": "true", "database.history.kafka.bootstrap.servers": "", "database.history.kafka.topic": "cdc.saic_test.history", "database.hostname": "172.20.3.83", "database.password": "MySQL!23", "database.port": "3306", "database.server.id": "18", "database.server.name": "cdc.saic_test", "database.user": "root", "database.whitelist": "saic", "include.schema.changes": "false", "tombstones.on.delete": "false" }'
1
2
3
4
5
6
7
8
9
10
11
12
13
14
15
16
17
18
19
20
curl -i -X POST -H "Accept:application/json" -H "Content-Type:application/json" 172.20.3.x:8083/connectors/ -d '{ "name": "jw04", "config": { "connector.class": "io.debezium.connector.mysql.MySqlConnector", "database.allowPublicKeyRetrieval": "true", "database.history.kafka.bootstrap.servers": "", "database.history.kafka.topic": "cdc.jsw04.history", "database.hostname": "", "database.password": "MySQL!234", "database.port": "3306", "database.server.id": "982", "database.server.name": "cdc.jw04", "database.user": "root", "database.whitelist": "dim", "include.schema.changes": "true", "max.batch.size": "2048", "poll.interval.ms": "1000", "tombstones.on.delete": "false" } }'
https://docs.confluent.io/current/schema-registry/develop/api.html#subjects
获取所有:
1
2
3
4
5
6
7
8
curl -X GET -H "Accept:application/json" 172.20.3.x:8091/subjects |python -m json.tool [ "cdc.mysqlconn09.company.emp-key" , "avro.registry.01-value" , "avro.registry.0102-value" ]
获取单个avro注册项目下的id列表
1
2
3
4
5
6
curl -X GET -H "Accept:application/json" 172.20.3.x:8091/subjects/avro.registry.01-value/versions |python -m json.tool [ 1, 2 ]
获取某个项目下的具体id中的内容
1
2
3
4
5
6
7
8
curl -X GET -H "Accept:application/json" 172.20.3.x:8091/subjects/avro.registry.01-value/versions/1 |python -m json.tool { "id" : 449, "schema" : "{\"type\":\"record\",\"name\":\"Employee\",\"fields\":[{\"name\":\"productId\",\"type\":\"int\"},{\"name\":\"productName\",\"type\":\"string\"},{\"name\":\"productPrice\",\"type\":\"double\"},{\"name\":\"productWeight\",\"type\":\"int\"},{\"name\":\"productDescription\",\"type\":\"string\"}]}" , "subject" : "avro.registry.01-value" , "version" : 1 }
获取某个项目下的具体id中内容的schema信息
1
2
3
4
5
6
7
8
9
10
11
12
13
14
15
16
17
18
19
20
21
22
23
24
25
26
27
28
29
curl -X GET -H "Accept:application/json" 172.20.3.x:8091/subjects/avro.registry.01-value/versions/2/schema |python -m json.tool { "fields" : [ { "name" : "productId" , "type" : "int" }, { "name" : "productName" , "type" : "string" }, { "name" : "productPrice" , "type" : "double" }, { "name" : "productWeight" , "type" : "int" }, { "name" : "productDescription" , "type" : "string" } ], "name" : "Product" , "namespace" : "productAvro" , "type" : "record" }
注册新的schema:
1 POST /subjects/(string: subject)/versions
根据avro-schema的id来获取其信息
1
2
3
4
5
curl -X GET -H "Accept:application/json" 172.20.3.x:8091/schemas/ids/449 |python -m json.tool { "schema" : "{\"type\":\"record\",\"name\":\"Employee\",\"fields\":[{\"name\":\"productId\",\"type\":\"int\"},{\"name\":\"productName\",\"type\":\"string\"},{\"name\":\"productPrice\",\"type\":\"double\"},{\"name\":\"productWeight\",\"type\":\"int\"},{\"name\":\"productDescription\",\"type\":\"string\"}]}" }
1 kafka-topics --bootstrap-server localhost:9092 --list |grep cdc.miao
1 kafka-avro-console-consumer --bootstrap-server localhost:9092 --topic topicName --property schema.registry.url="http://localhost:8091" --from-beginning
1 kafka-console-consumer --bootstrap-server localhost:9092 --topic topicName --from-beginning
1 kafka-console-consumer --bootstrap-server localhost:9092 --group group_name --topic topicName
1
2
3
kafka-consumer-groups --bootstrap-server localhost:9092 --list kafka-console-consumer --bootstrap-server localhost:9092 --topic __consumer_offsets --formatter "kafka.coordinator.group.GroupMetadataManager\$OffsetsMessageFormatter"
如果在某个消费组中未提交偏移量,则无法查看消费组的详情
1
2
3
4
5
6
kafka-consumer-groups --bootstrap-server localhost:9092 --describe --group miao GROUP TOPIC PARTITION CURRENT-OFFSET LOG-END-OFFSET LAG miao json0102 0 1170 2670 1500 miao json0102 1 1172 2672 1500 miao json0102 2 1174 2674 1500
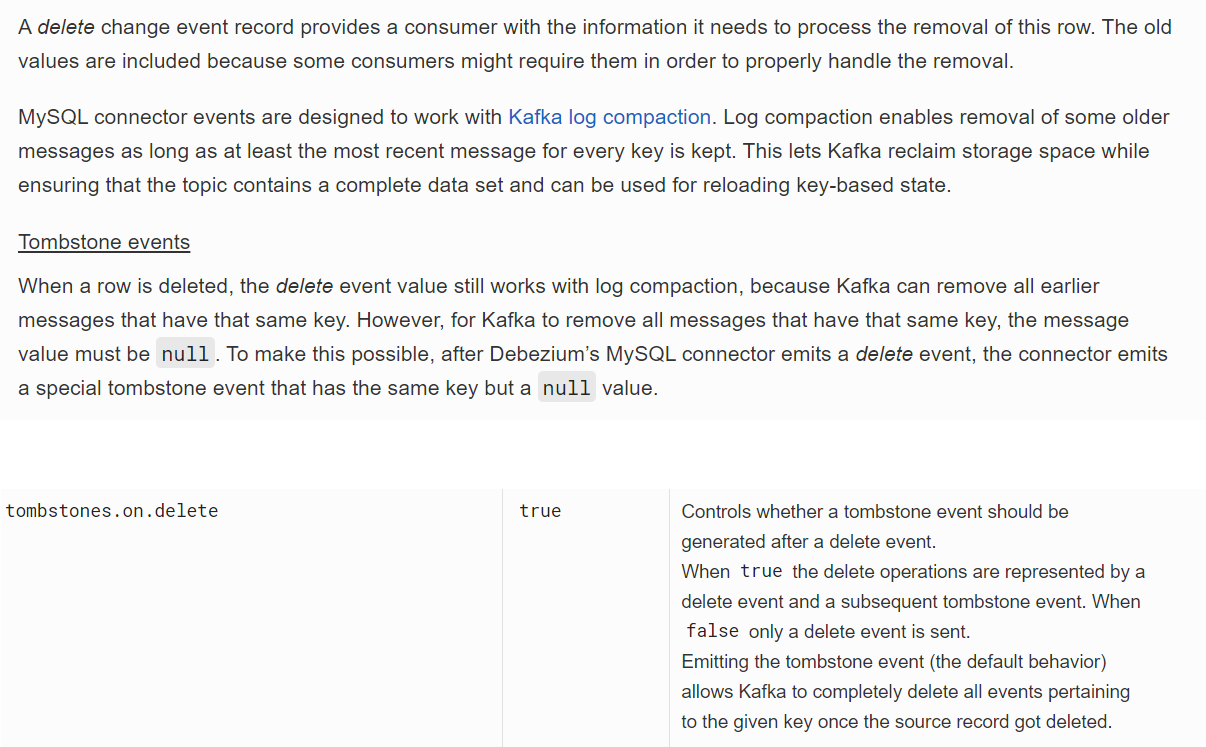
mysql在删除一条记录时,默认会向kafka发送两条数据 null,需要添加新配置:"tombstones.on.delete": "false"
问题描述;
1
2
3
4
5
6
7
8
9
针对mysql8.0升级Authentication认证方式后的报错解决:com.github.shyiko.mysql.binlog.network.AuthenticationException: Client does not support authentication protocol requested by server; consider upgrading MySQL 在使用 MySQL 8.0 时重启应用后提示 com.mysql.jdbc.exceptions.jdbc4.MySQLNonTransientConnectionException: Public Key Retrieval is not allowed 最简单的解决方法是在连接后面添加 allowPublicKeyRetrieval=true 文档中(https://mysql-net.github.io/MySqlConnector/connection-options/)给出的解释是: 如果用户使用了 sha256_password 认证,密码在传输过程中必须使用 TLS 协议保护,但是如果 RSA 公钥不可用,可以使用服务器提供的公钥;可以在连接中通过 ServerRSAPublicKeyFile 指定服务器的 RSA 公钥,或者AllowPublicKeyRetrieval=True参数以允许客户端从服务器获取公钥;但是需要注意的是 AllowPublicKeyRetrieval=True可能会导致恶意的代理通过中间人攻击(MITM)获取到明文密码,所以默认是关闭的,必须显式开启
解决办法:添加配置信息 "database.allowPublicKeyRetrieval":"true"
https://blog.csdn.net/qq_22313643/article/details/104869465
database.allowPublicKeyRetrieval=true
https://blog.csdn.net/Yuriey/article/details/80423504?utm_medium=distribute.pc_relevant.none-task-blog-BlogCommendFromMachineLearnPai2-1.channel_param&depth_1-utm_source=distribute.pc_relevant.none-task-blog-BlogCommendFromMachineLearnPai2-1.channel_param
1 alter user 'debezium'@'%' identified with mysql_native_password by 'debezium';
DDL的验证
支持DDL的捕获以下情形支持:
添加表(结果:实时schema主题中会多出ddl记录,包含建表语句,表topic在触发新表的时候会添加dml记录)
添加列不加默认值(结果:之前的数据不会变,会在实时schema主题中多出ddl记录语句,包含增加列的语句,在给旧数据新列中插入数据的时候,会在表topic中以update方式记录本次dml操作)
添加列并给列设置默认值(结果:并不会把现有的全量数据的变化都发送过来,而是只在实时schema主题中做ddl捕获)
查看mysql binlog日志的过期时间:
1
2
3
4
5
6
7
8
mysql> show variables like "%expire_logs%"; +----------------------------+-------+ | Variable_name | Value | +----------------------------+-------+ | binlog_expire_logs_seconds | 0 | | expire_logs_days | 1 | +----------------------------+-------+ 2 rows in set (0.37 sec)
设置binlog过期时间临时生效方式:
1
2
3
4
5
6
7
8
9
10
11
# 查看默认设置的过期时间 show variables like "%expire_logs%"; # 设置保留15天 set global expire_logs_days=15 # 刷新日志 flush logs; #查看新生成的binlog日志 show master status\G:
设置binlog过期时间永久生效
mysql的配置文件my.cnf位置:/opt/rdx/mysql
1
2
3
4
5
6
# 修改配置文件 vi /opt/rdx/mysql [mysqld]模块 expire_logs_days=15 注意:在配置文件修改后,需要重启才能永久生效。另,0表示永不过期,单位是天
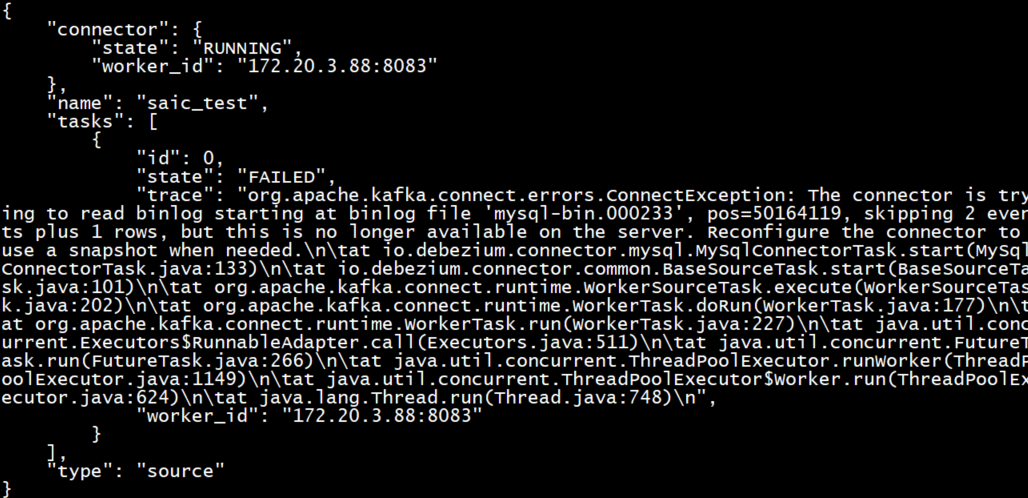
原因:由于mysql.binlog过期被自动清理,一旦采集任务上一次的binlog被自动清理,下次再启动时无法从上一次读取到的位置开始读取,就会报错,如果需要的话,可以为mysql重新指定一个快照,让cdc任务从指定的快照开始读取binlog
1
2
3
4
5
6
7
8
9
10
11
org.apache.kafka.connect.errors.ConnectException: The connector is trying to read binlog starting at binlog file 'mysql-bin.000492', pos=976732, skipping 2 events plus 1 rows, but this is no longer available on the server. Reconfigure the connector to use a snapshot when needed. at io.debezium.connector.mysql.MySqlConnectorTask.start(MySqlConnectorTask.java:133) at io.debezium.connector.common.BaseSourceTask.start(BaseSourceTask.java:101) at org.apache.kafka.connect.runtime.WorkerSourceTask.execute(WorkerSourceTask.java:202) at org.apache.kafka.connect.runtime.WorkerTask.doRun(WorkerTask.java:177) at org.apache.kafka.connect.runtime.WorkerTask.run(WorkerTask.java:227) at java.util.concurrent.Executors$RunnableAdapter.call(Executors.java:511) at java.util.concurrent.FutureTask.run(FutureTask.java:266) at java.util.concurrent.ThreadPoolExecutor.runWorker(ThreadPoolExecutor.java:1149) at java.util.concurrent.ThreadPoolExecutor$Worker.run(ThreadPoolExecutor.java:624) at java.lang.Thread.run(Thread.java:748)
1
2
3
show binlog events; --查看mysql-bin.000492是否存在
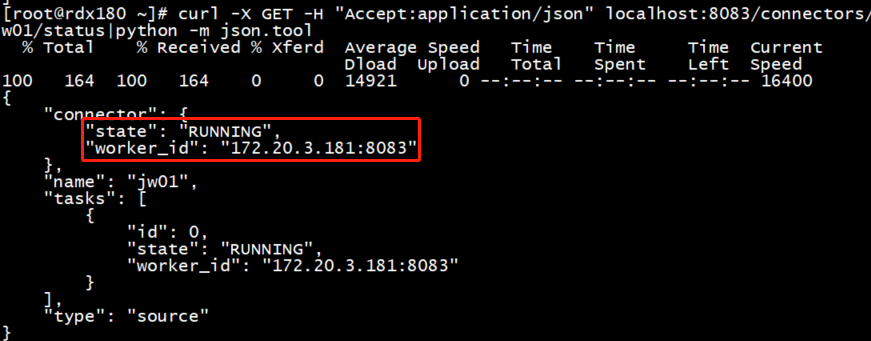
启动一个采集任务并查看发布到哪台节点上
此时任务成功运行在172.20.3.181这台节点上
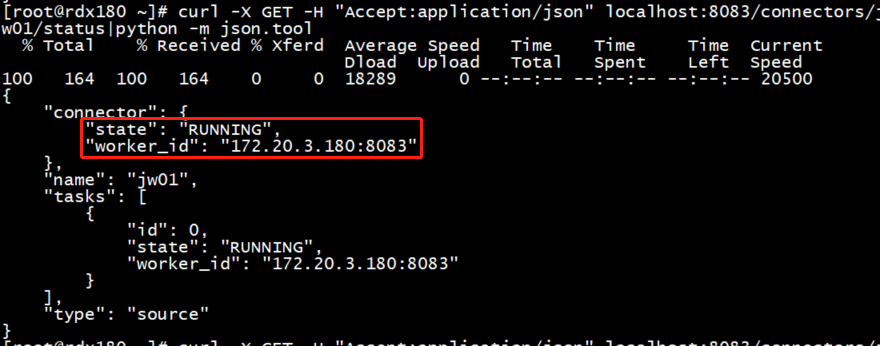
然后停掉172.20.3.181上的kafka-connect服务,再次查看任务的运行详情
使用"snapshot.mode": "schema_only"方式发布采集任务
任务级别不支持,不可以像mysql那样直接采集增量的数据。
增量方案:可以从数据上面过滤掉"op":"r"的数据,op为r的数据是初始化过程中读表的数据
已经支持表粒度
某张表共有a,b,c,d 4列,目前采只采集a,b,当改动c列的时候,数据会依然发送到kafka,只不过是只有a,b列的数据,这样相当于把没有变化的数据采集过来
CDC中的op是指某主键对应的数据行发生了改变(增、删、改)
1
2
3
4
5
6
7
8
9
10
"database.port" : "3306" ,"database.server.id" : "988" ,"database.server.name" : "cdc.jw10" ,"database.include.list" : "product" ,"table.include.list" : "product.book,product.meizu" ,"column.include.list" : "product.book.pid,product.book.pname,product.book.pcate,product.meizu.phone,product.meizu.price" ,"include.schema.changes" : "true" ,"max.batch.size" : "2048" ,"poll.interval.ms" : "1000" ,"tombstones.on.delete" : "false"
tags: GTID_mode mysql5.7.6+
debezium1.4在mysql-cdc配置上新增了gtid(全局事物标识),意味着每个task相当于一个mysql的从节点,每次数据采集主节点会携带一个gtid过来,根据gtid来判断事务一致性,确保不会重复采集,理论上可以实现exactly once,前提是源库开启gtid,版本要5.7以上


